前言
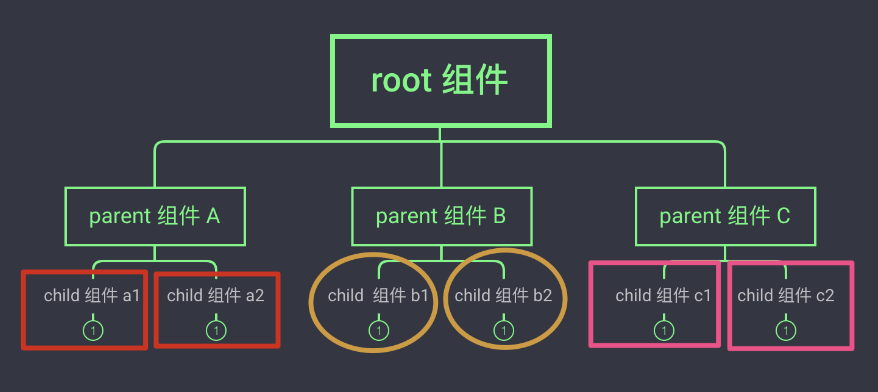
在Vue3中,组件之间的通信是构建复杂应用程序的基础。组件通信主要包括父传子、子传父以及兄弟组件通信。本文将详细讲解这三种通信方式,并通过代码示例进行演示。
父传子通信(Props)
父传子通信是Vue中最基本也是最常用的通信方式。父组件通过属性(props)向子组件传递数据。
「示例代码」:
「父组件(ParentComponent.vue)」 :
<template>
  <div>
    <child-component :message="parentMessage" :userInfo="userInfo"></child-component>
  </div>
</template>
<script setup>
import { ref, reactive } from 'vue';
import ChildComponent from './ChildComponent.vue';
const parentMessage = ref('Hello from Parent');
const userInfo = reactive({ name: 'John', age: 30 });
</script>
「子组件(ChildComponent.vue)」 :
<template>
  <div>
    <p>{{ message }}</p>
    <p>{{ userInfo.name }}</p>
  </div>
</template>
<script setup>
import { defineProps } from 'vue';
const props = defineProps({
  message: String,    userInfo: Object,
});
</script>在父组件中,通过v-bind指令(简写为:)将parentMessage和userInfo数据绑定到子组件的message和userInfo属性上。子组件通过defineProps函数接收这些属性,并在模板中使用。
子传父通信(Emit)
子组件可以通过触发事件的方式向父组件传递数据。Vue3中,子组件使用$emit方法触发事件,父组件通过监听这些事件来接收数据。
「示例代码」:
「父组件(ParentComponent.vue)」 :
<template>
  <div>
    <child-component @update="handleUpdate" @delete="handleDelete"></child-component>
  </div>
</template>
<script setup>
import { ref } from 'vue';
import ChildComponent from './ChildComponent.vue';
const handleUpdate = (data) => {
  console.log('Received from child:', data);
};
const handleDelete = () => {
  // 处理删除逻辑
};
</script>
「子组件(ChildComponent.vue)」 :
<template>
  <div>
    <button @click="handleClick">更新父组件</button>
  </div>
</template>

<script setup>
import { defineEmits } from 'vue';
const emit = defineEmits(['update', 'delete']);
const handleClick = () => {
  emit('update', { id: 1, value: 'new value' });
};
</script>在子组件中,通过defineEmits函数定义可以触发的事件。然后,在按钮点击事件中调用emit方法触发update事件,并传递数据给父组件。父组件通过v-on指令(简写为@)监听update和delete事件,并定义相应的事件处理函数。
兄弟组件通信
兄弟组件之间的通信通常需要通过一个共同父组件来中转,或者使用事件总线(如mitt库)来实现。
1. 通过父组件中转
「父组件(ParentComponent.vue)」 :
<template>
  <div>
    <sibling-a @message="handleMessage" />
    <sibling-b :message="message" />
  </div>
</template>

<script setup>
import { ref } from 'vue';
import SiblingA from './SiblingA.vue';
import SiblingB from './SiblingB.vue';
const message = ref('');
const handleMessage = (value) => {
  message.value = value;
};
</script>
「兄弟组件A(SiblingA.vue)」 :
<template>
  <button @click="sendMessage">发送消息</button>
</template>
<script setup>
import { defineEmits } from 'vue';
const emit = defineEmits(['message']);
const sendMessage = () => {
  emit('message', 'Hello from sibling A');
};
</script>
「兄弟组件B(SiblingB.vue)」 :
<template>
  <p>{{ message }}</p>
</template>
<script setup>
import { defineProps } from 'vue';
const props = defineProps(['message']);
</script>在这个例子中,兄弟组件A通过触发message事件向父组件发送数据,父组件接收到数据后更新自己的状态,并将状态通过props传递给兄弟组件B。
2. 使用事件总线(mitt)
首先,安装mitt库:
npm install mitt
然后,在main.js中全局配置事件总线:
import { createApp } from 'vue';
import mitt from 'mitt';
import App from './App.vue';
const app = createApp(App);
app.config.globalProperties.$bus = mitt();
app.mount('#app');
「组件A(ComponentA.vue)」 :
<template>
  <button @click="sendMessage">发送消息</button>
</template>
<script setup>
import { getCurrentInstance } from 'vue';
const { proxy } = getCurrentInstance();
const sendMessage = () => {
  proxy.$bus.emit('myEvent', 'Hello from ComponentA');
};
</script>
「组件B(ComponentB.vue)」 :
<script setup>
import { onMounted, getCurrentInstance } from 'vue';
const { proxy } = getCurrentInstance();
onMounted(() => {
  proxy.$bus.on('myEvent', (message) => {
    console.log(message); // 输出: "Hello from ComponentA"
  });
});
</script>
在这个例子中,组件A通过事件总线发送消息,组件B通过事件总线接收消息。这种方式不需要通过父组件中转,实现了兄弟组件之间的直接通信。
3.全局状态管理(Pinia)
通过集中式状态管理库(如 Pinia)共享全局状态。
创建 Pinia Store 组件 A 修改 Store 中的状态 组件 B 读取 Store 中的状态
代码示例
// stores/message.js
import { defineStore } from 'pinia';
export const useMessageStore = defineStore('message', {
  state: () => ({
    content: ''
  }),
  actions: {
    setContent(newContent) {
      this.content = newContent;
    }
  }
});
<!-- ComponentA.vue -->
<template>
<button @click="update">更新全局状态</button>
</template>
<script setup>
import { useMessageStore } from '@/stores/message';
const store = useMessageStore();
const update = () => {
store.setContent('全局消息内容');
};
</script>
<!-- ComponentB.vue -->
<template>
<div>{{ store.content }}</div>
</template>
<script setup>
import { useMessageStore } from '@/stores/message';
const store = useMessageStore();
</script>4.Provide/Inject + 响应式数据
通过祖先组件提供响应式数据,后代组件注入使用。
祖先组件使用 provide提供数据兄弟组件使用 inject注入数据
代码示例
<!-- Ancestor.vue -->
<template>
  <ComponentA />
  <ComponentB />
</template>
<script setup>
import { provide, ref } from 'vue';
const sharedData = ref('初始数据');
const updateData = (newValue) => {
  sharedData.value = newValue;
};
provide('sharedContext', {
  sharedData,
  updateData
});
</script>

<!-- ComponentA.vue -->
<template>
  <button @click="update">修改共享数据</button>
</template>
<script setup>
import { inject } from 'vue';
const { updateData } = inject('sharedContext');
const update = () => {
  updateData('新数据');
};
</script>

<!-- ComponentB.vue -->
<template>
  <div>{{ sharedData }}</div>
</template>
<script setup>
import { inject } from 'vue';
const { sharedData } = inject('sharedContext');
</script>
5、共享响应式对象
创建独立的响应式对象文件供组件导入。
创建共享状态文件 组件直接导入使用
代码示例
// sharedState.js
import { reactive } from 'vue';
export const state = reactive({
  value: '',
  setValue(newVal) {
    this.value = newVal;
  }
});
<!-- ComponentA.vue -->
<template>
<input v-model="state.value" />
</template>
<script setup>
import { state } from './sharedState';
</script>
<!-- ComponentB.vue -->
<template>
<div>{{ state.value }}</div>
</template>
<script setup>
import { state } from './sharedState';
</script>6.组件实例引用(ref)
通过 ref 直接访问组件实例方法。
父组件创建 ref 子组件暴露方法 通过 ref 调用方法
代码示例
<!-- Parent.vue -->
<template>
  <ComponentA ref="compA" />
  <ComponentB :trigger="compA?.method" />
</template>
<script setup>
import { ref } from 'vue';
const compA = ref(null);
</script>

<!-- ComponentA.vue -->
<script setup>
const method = () => {
  console.log('组件A的方法被调用');
};
defineExpose({ method }); // 必须暴露方法
</script>

<!-- ComponentB.vue -->
<template>
  <button @click="trigger">调用方法</button>
</template>
<script setup>
defineProps(['trigger']);
</script>
方法对比与选择建议
| 方法 | 优点 | 缺点 | 推荐场景 |
|---|---|---|---|
| Props + 事件 | 官方推荐,数据流清晰 | 层级深时繁琐 | 简单父子通信 |
| Pinia | 专业状态管理,响应式完善 | 需要学习成本 | 中大型应用 |
| 事件总线 | 完全解耦,灵活性强 | 需手动管理事件监听 | 临时事件通信 |
| Provide/Inject | 跨层级通信高效 | 数据流向不够直观 | 深层嵌套组件 |
| 共享对象 | 实现简单 | 难以维护 | 小型项目原型开发 |
| 组件实例引用 | 直接访问方法 | 破坏组件封装性 | 特殊场景应急使用 |
总结
Vue3中的组件通信方式多种多样,包括父传子(Props)、子传父(Emit)、兄弟组件通信(通过父组件中转、事件总线mitt、全局状态管理Pinia、Provide/Inject + 响应式数据、共享响应式对象、组件实例引用)。每种方式都有其优缺点和适用场景,如Props+事件适合简单父子通信,Pinia适合中大型应用,事件总线灵活但需手动管理。选择通信方式时需根据具体需求和应用规模进行权衡。
