在写Web端商城项目的时候, 我们经常会写到购物车
当点击加入购物车的时候, 不止是数据的加减, 我们还想做一个动画效果, 这样的交互效果, 客户体验会好一点
我们开始实现这种效果吧
我们先来画个页面
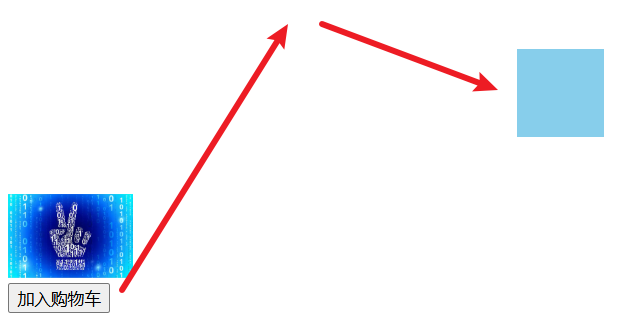
页面画好之后, 我们创建两个变量, 一个是队列数组, 一个是状态, 用于停止执行
data() {
  return {
    animationQueue: [],
    isAnimating: false,
  };
},
现在, 我们写点击里面的逻辑, 点击之后, 我们传入一个索引字段, 用于后面获取点击按钮的位置, 将当前要执行的索引传入队列中, 如果isAnimating为false, 我们就执行动画
handleClick(index) {
  this.animationQueue.push(index);
  if (!this.isAnimating) {
    this.$nextTick(this.runAnimation(index));
  }
},
执行动画中, 我们先来做一个判断, 如果执行队列没有数据, 我们就不再往下执行
if (this.animationQueue.length === 0) {
  this.isAnimating = false;
  return;
}
如果有数据, 我们需要变更状态为true
this.isAnimating = true;
随后获取图片,按钮和购物车icon的大小及其位置, 这里我们使用getBoundingClientRect来获取大小位置
https://developer.mozilla.org/zh-CN/docs/Web/API/Element/getBoundingClientRect
getBoundingClientRectApi
let productImage = null;
const targetObj = this.$refs.targetObj.getBoundingClientRect();
const targetX = targetObj.left + targetObj.width / 2;
const targetY = targetObj.top + targetObj.height / 2;
let productRect = null;
if (index === 1) {
  productImage = this.$refs.productImage;
  productRect = this.$refs.btnOne.getBoundingClientRect();
}
const startX = productRect.left + productRect.width / 2;
const startY = productRect.top + productRect.height / 2;
随后, 克隆图片的节点, 并追加样式, 使其定位在按钮附近
const clone = productImage.cloneNode(true);
Object.assign(clone.style, {
  position: "fixed",
  left: `${startX - 40}px`,
  top: `${startY}px`,
  width: `${65}px`,
  height: `${65}px`,
  pointerEvents: "none",
  zIndex: 9999,
  transform: "translate(0, 0) scale(0.3)",
  transition: "none",
});
document.body.appendChild(clone);
随后, 我们创建几个变量, 分别是动画的总时长, 开始时间, 开始坐标到结束坐标的直线距离, 抛物线最大高度(避免抛物线过高)
const duration = 800;
const startTime = Date.now();
const distance = Math.sqrt(
    Math.pow(targetX - startX, 2) + Math.pow(targetY - startY, 2)
);
const parabolaHeight = Math.min(200, distance / 2);
我们使用浏览器原生动画API, 传入一个回调函数, 让浏览器下次重绘之前执行我们提供的函数
https://developer.mozilla.org/zh-CN/docs/Web/API/Window/requestAnimationFrame
requestAnimationFrame
request AnimationFrame(animate);
const animate = () => {}
现在, 我们写这个回调函数, 在回调函数里面, 动画未结束时, 我们计算了x,y坐标, y坐标计算使其先上升后下降, 不断地递归计算进行平移, 当动画结束时, 我们移除元素, 将状态初始化即可
const animate = () => {
  const elapsed = Date.now() - startTime;
  const progress = Math.min(elapsed / duration, 1);
  if (progress < 1) {
    const x = startX + (targetX - startX) * progress - 30;
    const y =
        startY +
        (targetY - startY) * progress -
        parabolaHeight * (4 * progress * (1 - progress)) -
        30;
    clone.style.transform = `translate(${x - startX}px, ${
      y - startY
    }px) scale(${1 - progress * 0.2})`;
    clone.style.opacity = 1;
    requestAnimationFrame(animate);
  } else {
    clone.remove();
    this.isAnimating = false;
  }
};
这样, 我们的一个小功能就做好了, 看下效果
今天我们就讲解到这里